Guide to Computer Music.
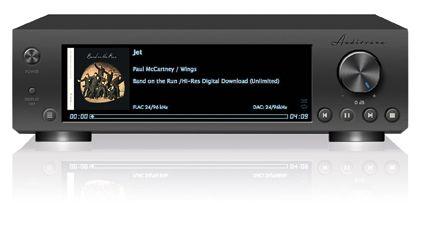
Computer music
Computer audio is now one of the most important growth areas in two-channel audio. It is no longer the preserve of the budget category or lifestyle setups and there is now a wider selection of equipment available at virtually every price point from the very affordable to the ultra high end.
At the same time, the supporting infrastructure that allows computer audio to deliver on the promises of sound quality and convenience has made equally significant progress. Storage is cheap and getting cheaper. It is also getting smarter and easier to use – not always a given in the world of IT. Further aiding this process, playback and ripping programs have been improving in leaps and bounds too. The best playback software is now impressively stable, easy to use and almost endlessly customisable to your specific needs. Some of this comes courtesy of hi-fi manufacturers creating ever more effective control applications while other options come from software companies direct, looking for new custom.
The final piece of the puzzle – the availability of lossless and hi-res audio material to actually buy and use without any intervening steps – is also making progress. It is fair to say that developments in this area still lags behind the quality of the playback equipment and supporting ancillaries, but retailers are selling more music in more formats than ever before and the trend is on the up. We are reaching the stage where ripping and tagging is something that can take a back seat once your legacy material has been correctly archived.
There are two ways to get into computer audio, either by streaming it directly from storage via network or playing it out via your USB socket to a compatible DAC. There are pros and cons to both, but there are important differences. The USB approach is simple and cheap, requiring the purchase of a decent USB lead long enough to reach your hi-fi and a DAC with a USB input. The streaming approach is a little more involved, as you need a streamer, some uPnP software, a wireless router and ideally a NAS hard-disk drive. It is easier than it seems, though, especially if you structure it carefully from the start.
The most important decision to make is how to store your digital music. We’d recommend Free Lossless Audio Codec (FLAC) as the best compromise, because unlike the computer file equivalent of CD music – WAV – FLAC files allow the use of ‘metadata’. Embedded inside every FLAC file along with the music is a little string of data containing information about the song, such as the artist, name, genre and cover art. It makes cataloguing and searching your digital music library so much easier.
Keep it tidy
In the early days of storing music on hard disc when storage was expensive, FLAC offered the benefit of being ‘compacted’. Although none of the music data is discarded – unlike MP3 or AAC – FLAC is better at keeping its files ‘tidy’ and eliminates redundant space on the disk. Arguments rage in computer audio circles about whether uncompacted WAV files sound better than FLAC. It is important to take two things into account. The first is that all FLAC files can be restored to their original file size and type – the only difference is that increasing the compression will increase the effort it takes to restore the file. The second is that some software now rips to uncompressed FLAC – ie exactly the same data rate as WAV, which should result in an identical performance only with much easier tagging.
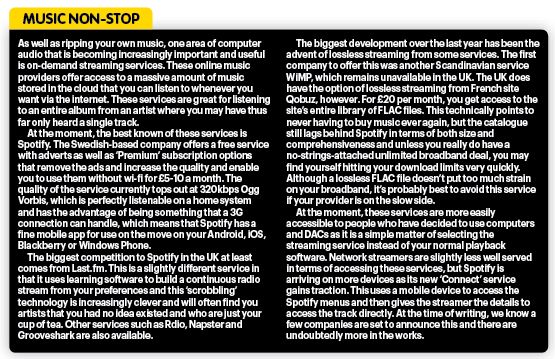
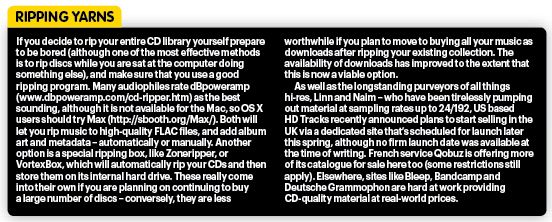
Okay, so where do you get these music files that you want to play? There are two ways – people rip (or ‘record’) their existing CD collections or download new music. The first is easier said than done, not because it’s tricky to do, but because it’s a tedious task that takes weeks if you have a large music collection. If you own thousands of CDs, your easiest option might be to have a professional organisation do the work for you. Prices vary as do some of the options available in terms of formats, tagging and storage. If you have a huge collection and the budget for it, it’s by far the fastest option, but some might find the prospect of sending their entire CD collection away via a courier to be a tad traumatic!
The hard stuff
Once you have your files, you have a simple choice between a USB-capable DAC or a streamer. The first option is the most straightforward, but to get the best out of it you need to think carefully about the software you’ll be playing your files with. Most people will be familiar with iTunes, which is an easy way to play music stored on computers, but it isn’t ideal for lossless and hi-res use, not least because it doesn’t play FLAC files by default and cannot handle higher sampling rates at all. Instead, it’s sensible to invest in a software player that turns off all the extraneous processing that goes on in any computer, and bypasses any internal sound mixing or signal processing.
Again, a number of options are available, but JRiver (jriver.com) for the PC or Audirvana Plus (audirvana.com) for the Mac are excellent starting points. Both Windows and OS X are set by default to up or downsample the audio output, and/or mix system sounds into it, whereas these applications will give you ‘bit-perfect’ playback where what comes out is exactly the same as what went in. They read the music into RAM memory, which doesn’t require continuous and electrically noisy hard disk usage while playing, which is a major boon. All are free to trial, and cost up to £70 to buy the full versions.
The harder they come
Next comes the hard disk. Of course, every computer has one and there’s no need for you to buy additional storage to get a sound from your speakers. If you have your whole music collection on your computer, however, it’s a very good idea to buy a bespoke hard drive to store it on – not least because it frees the internal drive up for general use. A simple portable hard drive will suffice for those playing their music out from their computer via USB although there are some benefits to solid-state (SSD) types over conventional hard drives as they have faster access and fewer read errors, which helps as far as sound is concerned.

Those intending to stream their music via a network should seriously consider investing in a dedicated Network Attached Storage (NAS) drive. The beauty of this is that it’s very easy to use with any networked music streamer, thanks to its built-in media server software – which in the case of some drives is increasingly sophisticated. This means you don’t have to download and run UPnP server software such as Twonky or Asset – which you’d otherwise have to do to make your streamer ‘see’ your computer as a music source on the network. Many NAS models are ‘bay’ types that allow you to select your drive size and use one as a RAID type backup, but nothing is more effective than a second drive that is connected only for backing up if you want true peace of mind.
 If you’re using a PC and a USB DAC, you’ll need to install the USB audio driver for the DAC. This is supplied by the manufacturer and will normally be downloadable from its website. Never connect the USB DAC to the PC before you’ve installed the driver. If you’re using a Mac, there’s no need to install a driver – although Mavericks may need you to change your MIDI and sound settings to allow hi-res playback. Now it’s time to set up the computer’s sound system for best performance. In the PC environment, JRiver has a tools/options sub-menu that lets you select ‘Wasapi Event Style’ that bypasses the internal audio mixer – this is the computer audio equivalent of pressing the ‘source direct’ button. Next, you must tell your PC to output the sound to the USB DAC, so click on the Output Mode Settings box and specify your USB DAC as the output device. With Macs, go to Preferences/Audio System in Audirvana and specify your USB DAC as the Preferred Audio Device. Make sure you’ve got Exclusive Access Mode and Integer Mode selected, and you’re good
to go.
Streamer users can relax, as there’s no need to fiddle with USB audio device settings. The best results are normally achieved with wired networks – this is not so much because the performance of wireless is always inferior, but because you are removing some of the variables that can affect performance that you have no control over. Some NAS drives allow for direct connection via Ethernet, but the most effective way of connecting drive and streamer together is via a router as this will make the drive available to more than one streamer and allow for use of a control app via a phone or tablet. The quality of most manufacturer supplied apps is now very good, but Bubble UPnP (Android) and PlugPlayer (iOS) are decent options.
Once all of this is done, you’ll have the makings of a serious computer audiophile system. Both the USB DAC and the streamer-based approach will give you access to hi-res files of very high quality, and if you’ve only ever used CD before, you will be blown away by the performance that some files offer in comparison. Take care to get the basics right and you will have a system that allows for a very happy combination of performance and convenience so that you can experience more music from more places than ever before – there’s never been a better time to make the switch.
Player's association
If you want to the turn the music up on your computer, don’t use iTunes or Windows Media Centre. These are fine for chart pop and background music, but in sonic terms they send the music round the houses and back again, before reaching the outside world, going through all manner of strange and unnecessary processing before coming out of your speakers. Also, particularly in the case of iTunes, there’s no default FLAC support, which in true Apple style means the user is cut off from the main music format that the rest of the planet is using!
That’s why it is essential to invest in serious music playback software, and the good news is that there are numerous such players available, all of which have a slightly different presentation, visually and sonically. Mac users should investigate Audirvana, PureMusic, Amarra, Cog, Neutrino or Ayre Audio. PC users will want to check out Foobar20000, AIMP 2, MediaMonkey, Winamp Full, JetAudio, JRiver, MusicBee or Jaangle. It’s a good idea to see which ones best suit your particular needs and then download the demo versions to try for yourself, then you can buy the one you like best of all.
 |
Inside this month's issue:
Q Acoustics 3020c standmount loudspeakers, Perlisten R10s active subwoofer, Quad 33 and 303 pre/power amps, Acoustic Solid Vintage Full Exclusive turntable, newcomer Fell Audio Fell Amp and Fell Disc and lots, lots more...
|
